


")


")


Key Takeaways
- Optimize Analytics Precision: Implement Google Tag Manager step by step to enhance data accuracy. Tags, triggers, and variables work together seamlessly for precise insights.
- Empower Customization: Unleash the potential of advanced features like the data layer and custom JavaScript variables for tailored analytics configurations that align with your unique tracking needs.
- Continuous Improvement: Beyond setup, embrace testing, debugging, and continuous monitoring to ensure your analytics strategy evolves with changing user behaviors, delivering an optimized digital experience.
In the ever-evolving landscape of digital marketing, harnessing the power of data is paramount to success.
Understanding user behavior, tracking conversions, and optimizing your website’s performance are crucial components in achieving your online objectives.
One tool that has emerged as a game-changer in this realm is Google Tag Manager (GTM).
If you find yourself grappling with the complexities of implementing and managing various tracking codes on your website, GTM is the beacon of light you’ve been searching for.
This comprehensive guide aims to demystify the process of setting up Google Tag Manager for your website, offering a step-by-step walkthrough that even beginners can follow with ease.
Whether you’re a seasoned marketer, a business owner, or a curious individual looking to enhance your digital prowess, understanding how to leverage GTM can significantly elevate your online presence.
Why GTM? Unveiling the Power of Simplicity and Efficiency
Before delving into the nitty-gritty of the setup process, let’s take a moment to understand why Google Tag Manager has become the go-to solution for countless professionals across the digital landscape.
Imagine a world where the convoluted process of manually inserting tracking codes on your website becomes a relic of the past.
GTM revolutionizes the game by providing a centralized platform for tag management, offering a streamlined and user-friendly interface that simplifies the entire process.
Beyond its simplicity, GTM contributes to enhanced website performance.
By minimizing the need for multiple code installations and updates, your site’s load time is optimized, contributing to a seamless user experience.
Picture a scenario where you can effortlessly add, edit, or remove tags without delving into the intricacies of your website’s source code – that’s the power of Google Tag Manager.
Embarking on the GTM Journey: A Step-by-Step Odyssey
Now that the stage is set, it’s time to embark on our step-by-step journey through the realms of Google Tag Manager.
If you’re new to the world of GTM, fear not.
We’ll guide you through the process of creating your GTM account, setting up your first container, and navigating the user-friendly interface.
As we navigate this odyssey, you’ll discover the significance of tags and triggers, the dynamic duo that empowers GTM to capture a myriad of user interactions and events on your website.
Putting GTM to the Test: Debugging and Optimization
No journey is complete without facing challenges.
In the world of Google Tag Manager, testing and debugging are essential pit stops on the road to accurate data collection.
We’ll explore the ins and outs of GTM’s Preview mode, equipping you with the tools to troubleshoot common issues and ensure that your tags are firing seamlessly.
But our exploration doesn’t stop there.
We’ll delve into the advanced features of Google Tag Manager, including the utilization of data layers for enhanced tracking and the implementation of variables for dynamic data capture.
These tools, often underutilized, can catapult your tracking capabilities to new heights.
Beyond the Basics: Best Practices and Continuous Improvement
As you master the fundamentals, we’ll guide you through the best practices for organizing your GTM account effectively, implementing version control for seamless collaboration, and conducting regular audits to keep your tracking shipshape.
The digital landscape is ever-changing, and we’ll empower you not just to set up GTM but to continuously optimize and adapt to the evolving needs of your online presence.
Before we venture further, we like to share who we are and our digital experiences.
About AppLabx
From developing a solid marketing plan to creating compelling content, optimizing for search engines, leveraging social media, and utilizing paid advertising, AppLabx offers a comprehensive suite of digital marketing services designed to drive growth and profitability for your business.
AppLabx is well known for helping companies and startups use digital marketing to drive web traffic to their websites and web apps.
At AppLabx, we understand that no two businesses are alike. That’s why we take a personalized approach to every project, working closely with our clients to understand their unique needs and goals, and developing customized strategies to help them achieve success.
If you need a digital consultation, then send in an inquiry here.
Setting Up Google Tag Manager for Your Website: A Step-by-Step Guide
- Why Use Google Tag Manager
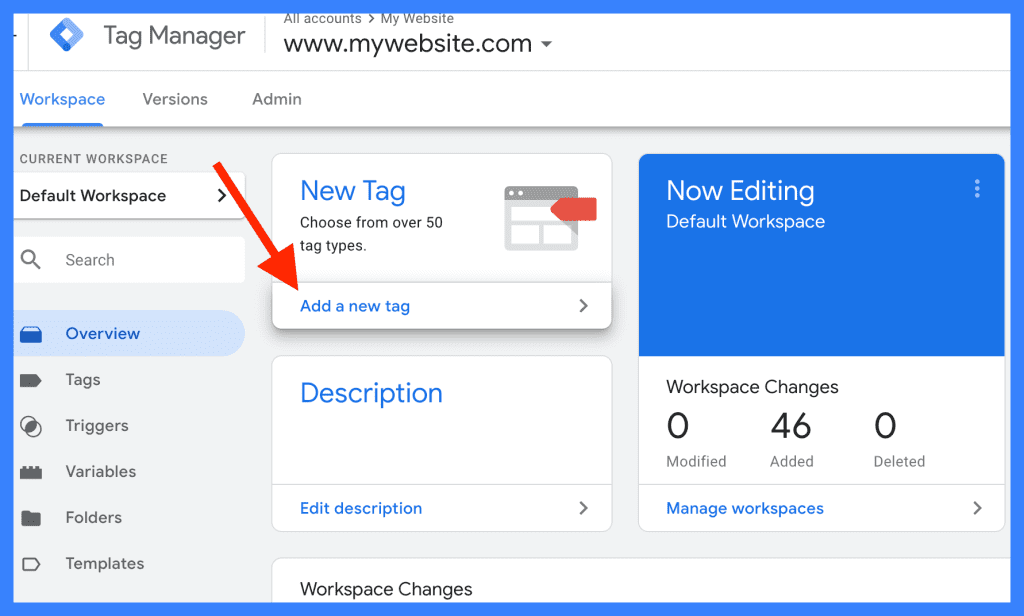
- Installing Google Tag Manager on Your Website
- Creating Tags in Google Tag Manager
- Setting Up Triggers in Google Tag Manager
- Testing and Debugging
- Advanced Google Tag Manager Features
1. Why Use Google Tag Manager
In the fast-paced world of digital marketing, managing the myriad of tracking codes and tags that fuel your analytics can be a daunting task.
Enter Google Tag Manager (GTM), a robust solution designed to simplify tag management and revolutionize the way you handle website tracking. Let’s explore the compelling reasons why you should embrace GTM for your digital endeavours.
Simplified Tag Management for Marketers and Developers
Managing various tags manually can be time-consuming and error-prone.
GTM acts as a central hub, allowing marketers to add, edit, and update tags without delving into the website’s source code.
Consider a scenario where a marketing team wants to implement a new tracking pixel for a promotional campaign.
With GTM, the marketing team can add the pixel without requiring developer intervention, expediting the implementation process.
Enhanced Website Performance and User Experience
Reducing the number of scripts directly embedded in your website can improve page load times and overall performance.
According to a study by Google, conversions can fall by up to 20% for every second delay in mobile page load. GTM’s streamlined approach contributes to faster loading, positively impacting user experience and conversion rates.
Centralized Tracking and Analytics
GTM serves as a centralized platform for managing various tracking codes, ensuring consistency and accuracy in data collection.
Imagine a large e-commerce website with multiple marketing campaigns running simultaneously.
GTM allows the marketing team to manage all tracking codes in one place, preventing discrepancies and providing a holistic view of user interactions across different channels.
Flexibility and Agility in Tag Implementation
GTM provides a flexible environment where tags can be easily added, modified, or removed without requiring constant developer involvement.
GTM’s user-friendly interface empowers marketers to adapt to changing requirements swiftly.
Version Control for Seamless Collaboration
GTM incorporates version control, allowing users to track changes, revert to previous versions, and collaborate effectively.
In a collaborative digital marketing environment, multiple team members may be working on different aspects of tag management.
GTM’s version control ensures that changes are documented, minimizing the risk of conflicts and errors.
Cost-Efficiency and Time Savings
Implementing and managing tags manually can be resource-intensive.
GTM streamlines the process, saving time and reducing the need for extensive developer involvement.
Customization for Diverse Tracking Needs
GTM offers a wide range of built-in and custom templates, allowing users to tailor tracking to specific business goals.
A content-based website may use custom tracking events to monitor user engagement with different types of content, providing valuable insights for content optimization strategies.
Seamless Integration with Google Analytics and Other Tools
GTM integrates seamlessly with Google Analytics and other third-party tools, creating a unified analytics ecosystem.
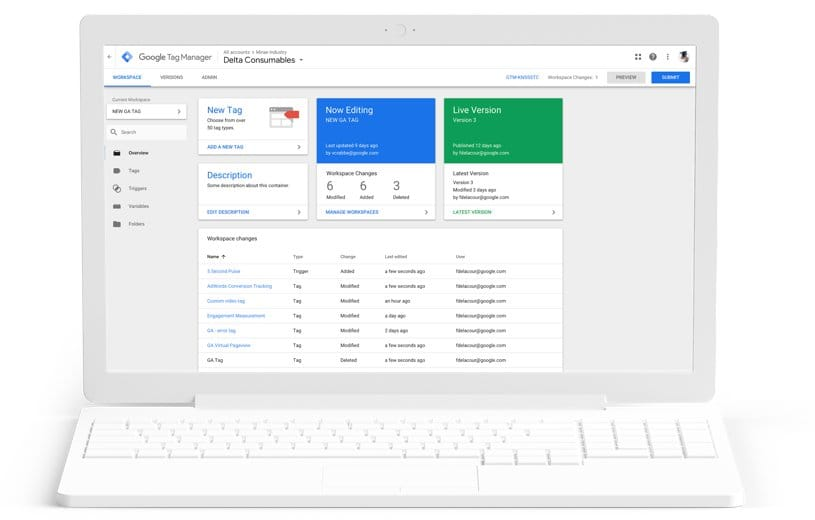
2. Installing Google Tag Manager on Your Website
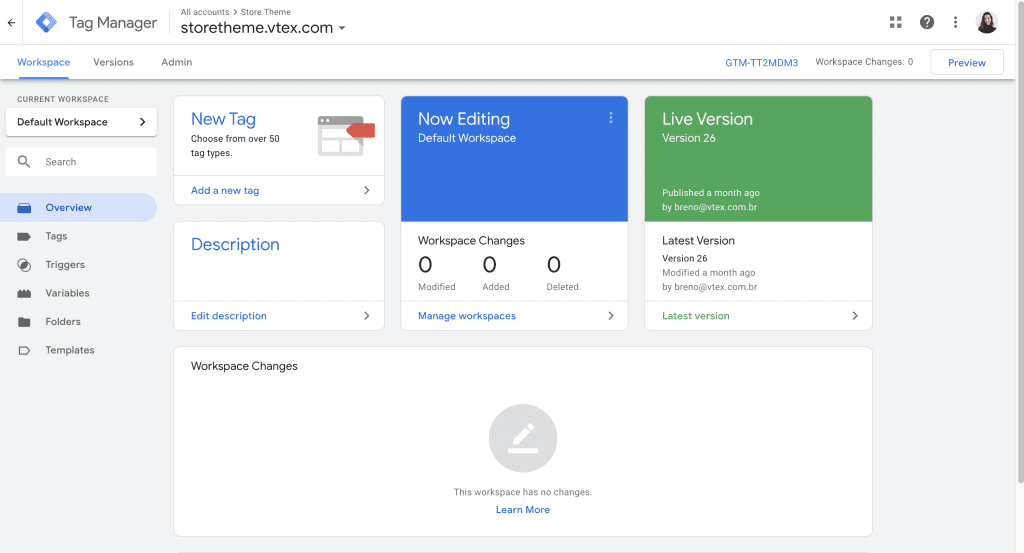
Installing Google Tag Manager (GTM) is a pivotal moment in transforming your website into a data-driven powerhouse.
This section will guide you through the process, from generating the GTM container code to verifying its successful implementation, ensuring a seamless integration that empowers you to harness the full potential of this robust tracking tool.
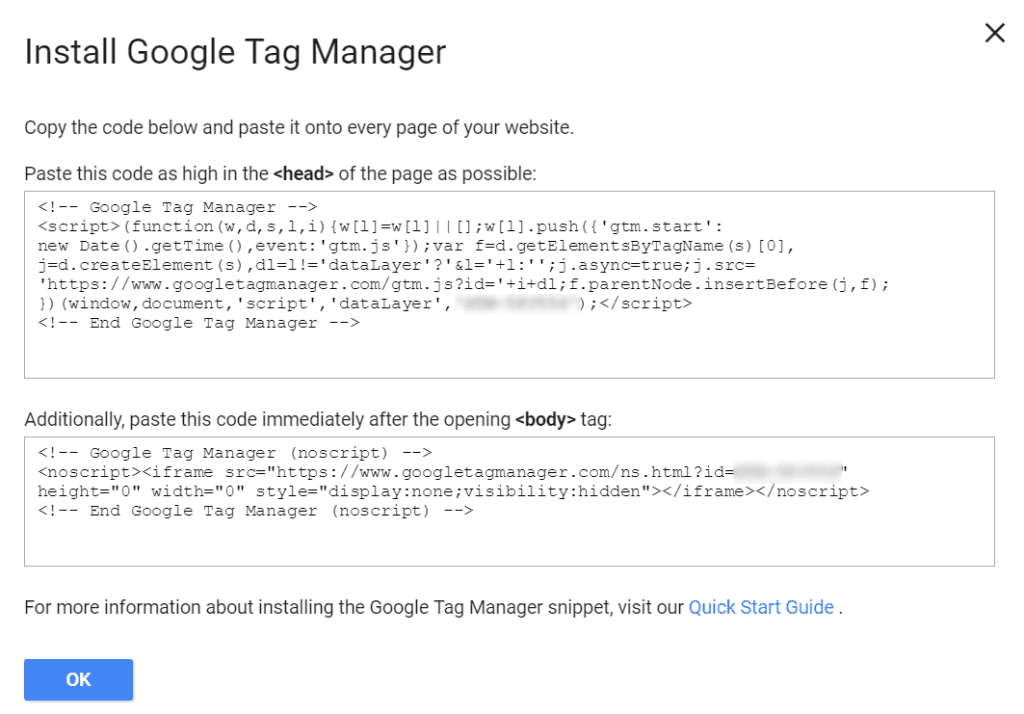
Generating GTM Container Code
After setting up your GTM account and creating a container, GTM generates a unique container code.
This code is essential for linking your website to the GTM platform.
Imagine you operate an online retail store.
The container code serves as the gateway for implementing various tags, such as e-commerce tracking and user engagement metrics, offering invaluable insights into customer behaviour.
Placing the GTM Code on Your Website Manually
Manually placing the GTM container code involves inserting it into the HTML of your website.
This method provides precise control over code placement, suitable for users comfortable with web development.
Consider a tech-savvy blogger managing a personal website.
Manually placing the GTM code allows them to customize its location, ensuring seamless integration with other scripts and elements on their site.
Implementing GTM Code via a Content Management System (CMS)
Many websites, especially those built on popular CMS platforms like WordPress, offer a streamlined process for integrating GTM.
This involves pasting the container code into designated areas without directly manipulating the site’s HTML.
WordPress powers 42.8 % of all websites, according to W3Techs.
The ease of integrating GTM with CMS platforms makes it accessible to a broad user base.
Compatibility with Various Website Platforms
GTM is designed to be platform-agnostic, ensuring compatibility with a diverse range of website platforms.
Whether you’re using WordPress, Shopify, or a custom-built site, GTM seamlessly integrates with minimal effort.
Verifying the Installation
Verifying the installation is crucial to ensure that the GTM container code is correctly implemented on your website.
GTM provides a Preview mode, allowing you to test and confirm that tags are firing as expected.
Imagine an e-commerce business launching a flash sale. Verifying the installation ensures that conversion tracking and promotional tags are active, providing real-time data on campaign performance.
3. Creating Tags in Google Tag Manager
Creating tags in Google Tag Manager (GTM) is where the true power of this tool unfolds.
Tags are the building blocks that enable you to track various user interactions and events on your website.
Understanding the Significance of Tags in GTM
Tags are snippets of code that collect data and send it to third-party tools, such as Google Analytics, Facebook Pixel, or custom scripts. Understanding the purpose of tags is essential for effective tracking.
Imagine you run an online store.
Tags enable you to track not only page views but also specific events like product clicks, add-to-cart actions, and successful purchases, providing granular insights into user behavior.
Adding Common Tags in Google Tag Manager
GTM simplifies the process of adding common tags by providing pre-configured templates for popular tools.
This includes Google Analytics, Google Ads, Facebook Pixel, and more.
Google Analytics is used by 84.5% of all the websites, according to W3Techs.
Utilizing GTM for Google Analytics implementation showcases its widespread adoption in simplifying common tracking tasks.
Customizing Tags for Specific Tracking Needs
While common tags cover fundamental tracking, GTM’s true strength lies in its ability to create custom tags tailored to your unique tracking requirements.
Consider a content-based website.
In addition to tracking page views, custom tags can be created to monitor specific user interactions, such as video views, form submissions, or social media shares, providing a holistic view of user engagement.
Leveraging Custom Event Tracking in GTM
Custom events in GTM allow you to track user interactions beyond page views, providing a nuanced understanding of how users engage with your site.
Dynamic Tag Implementation with Variables
Variables in GTM serve as placeholders for dynamic data. Integrating variables into your tags allows for personalized and dynamic tracking based on user interactions.
Picture an e-commerce website offering discounts.
Utilizing variables, you can create a tag that dynamically tracks the specific discount codes users apply during the checkout process, providing insights into the effectiveness of different promotions.

E-commerce Tracking for Online Retailers
E-commerce tracking in GTM enables online retailers to capture detailed data on user transactions, including product impressions, purchases, and revenue.
Global e-commerce sales are expected to grow to $6.4 trillion by 2024.
Implementing e-commerce tracking through GTM is crucial for online retailers looking to optimize their sales funnel.
Mobile App Tracking with GTM
GTM extends its tracking capabilities beyond websites to mobile apps.
This feature allows you to monitor user interactions within your mobile application.
In 2026, consumers are projected to download 143 billion mobile apps from the Google Play Store and 38 billion downloads from the Apple App Store. GTM’s mobile app tracking addresses the growing importance of mobile-centric analytics.
Integration of Social Media Tracking Tags
GTM facilitates the integration of social media tracking tags, allowing you to monitor user interactions with social sharing buttons and other social elements on your website.
Consider a media company.
Social media tracking tags can be implemented to measure the impact of social shares on article visibility and user engagement, providing valuable insights for content strategy.
Ensuring GDPR Compliance with Consent Tags
In the era of privacy concerns, GTM offers solutions for GDPR compliance by allowing the implementation of consent tags.
These tags ensure that data collection adheres to user preferences and consent.
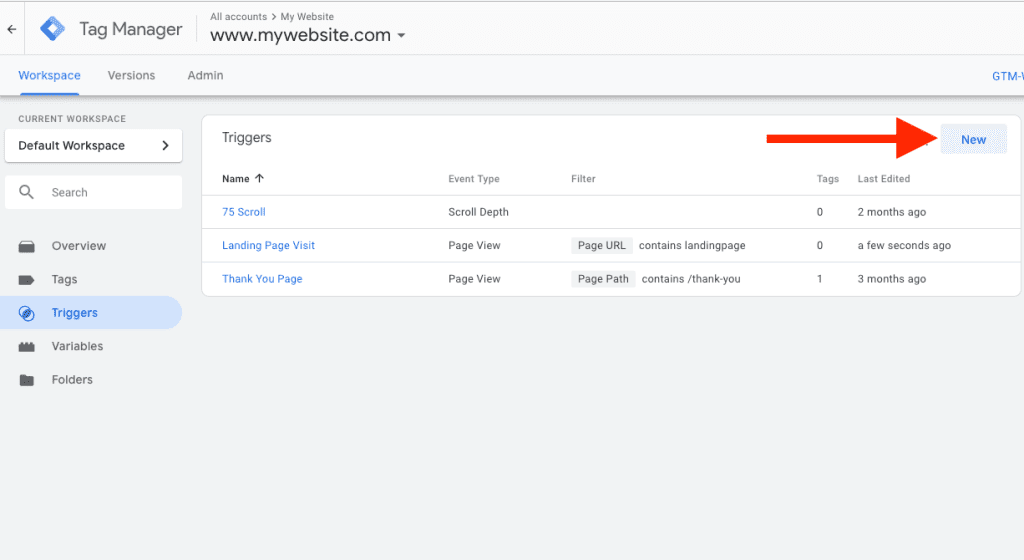
4. Setting Up Triggers in Google Tag Manager
Setting up triggers in Google Tag Manager (GTM) is a crucial step in refining your analytics strategy.
Triggers define when tags should fire, allowing you to capture specific user interactions and events on your website.
In this detailed guide, we’ll explore the significance of triggers and delve into the advanced techniques GTM offers for precision tracking.
Understanding the Role of Triggers in GTM
Triggers act as the catalyst for tag firing.
They specify the conditions under which a tag should be activated, ensuring that data collection aligns with your tracking objectives.
Imagine an online store.
Setting up a trigger for the “Add to Cart” button ensures that the associated tag (e.g., for tracking conversions) only fires when users engage with this specific element, providing targeted insights into the purchase journey.
Creating Basic Page View Triggers
Page view triggers are fundamental in GTM.
They allow you to capture when a user lands on a specific page or a group of pages.
Implementing Event-Based Triggers
Event-based triggers in GTM enable you to capture specific user interactions, such as button clicks, form submissions, or video views.
For a content-heavy website, setting up an event-based trigger for “Video View” allows you to track user engagement with video content, providing insights into popular videos and audience preferences.
Utilizing Click Triggers for Detailed Interaction Tracking
Click triggers in GTM focus on interactions with specific elements on a page, like buttons, links, or images.
Consider a blog with subscription buttons. By implementing click triggers, you can track how many users engage with the “Subscribe” button, allowing you to optimize your call-to-action strategies.
Time-Based Triggers for Session Duration Analysis
Time-based triggers enable you to track user interactions based on their session duration, providing insights into engagement patterns.
The industry benchmark for average dwell time is considered somewhere between 2-4 minutes. Time-based triggers help you understand user behaviour during these critical minutes.
Scroll Depth Triggers for Content Engagement
Scroll depth triggers monitor how far users scroll down a page, offering insights into content engagement.
In a long-form article, setting up scroll depth triggers allows you to identify the point at which users typically disengage.
This information is valuable for optimizing content length and layout.
Advanced Triggers Using Data Layer Variables
Data layer variables in GTM provide advanced trigger options by allowing you to set conditions based on dynamic data.
Imagine an e-commerce site.
By using data layer variables, you can create a trigger that fires only when a user adds a high-value item to their cart, providing specific data for targeted marketing efforts.
Trigger Groups for Complex Condition Sets
Trigger groups in GTM allow you to combine multiple triggers into a logical set, enabling more complex and nuanced conditions.
Consider an online service with a multi-step signup process.
A trigger group can be set up to fire a tag only when a user completes all the required steps, offering insights into conversion funnel performance.
Utilizing Regex and Custom Events for Flexibility
Regular expressions (regex) and custom events in GTM provide flexibility in creating triggers with intricate conditions.
Monitoring Trigger Performance and Adjusting Settings
Regularly monitoring trigger performance is essential. Adjust settings based on analytics data to refine trigger conditions for optimal accuracy.
5. Testing and Debugging
Testing and debugging are paramount processes in web development, ensuring the functionality, performance, and reliability of websites and applications.
This comprehensive guide explores the significance of testing and debugging, provides practical examples, and incorporates relevant data and statistics from authoritative sources to underscore the importance of these practices.

The Crucial Role of Testing in Web Development
Testing is the systematic process of evaluating a system or its components with the intent to find whether it satisfies the specified requirements.
In web development, testing is a critical phase that spans various dimensions, including functionality, usability, security, and performance.
Types of Testing in Web Development
- Functional Testing:
- Ensures that the application functions as intended, with tests focusing on individual functions and their interactions. Common methods include unit testing, integration testing, and system testing.
- Example: Verifying that a contact form successfully sends messages to the designated email addresses.
- Usability Testing:
- Assesses the user-friendliness of the website or application, including navigation, design, and overall user experience.
- Performance Testing:
- Evaluates the system’s responsiveness, speed, and overall performance under various conditions, such as heavy traffic or high data loads.
- Example: Measuring the website’s load time and server response time under different user scenarios.
- Security Testing:
- Identifies vulnerabilities and weaknesses in the application to prevent potential security breaches.
- Compatibility Testing:
- Ensures that the website or application functions correctly across different devices, browsers, and operating systems.
The Debugging Process: Unraveling Code Issues
Debugging involves identifying, isolating, and fixing issues or bugs within the code.
This iterative process is crucial for maintaining a stable and error-free website.
Identifying and resolving a JavaScript error that prevents a crucial form submission on an e-commerce site.
Importance of Early Testing in the Development Lifecycle
Introducing testing early in the development lifecycle helps identify and address issues at the outset, reducing the cost and effort required for fixing problems in later stages.
Fixing an error discovered after a product’s launch costs four to five times more than one discovered during design, and up to 100 times more than one identified during the upkeep phase.
Automated Testing: Streamlining the Process
Automated testing involves using specialized tools and scripts to execute test cases, significantly speeding up the testing process and ensuring consistent results.
Implementing automated unit tests for a web application’s backend logic to validate its correctness.
Continuous Integration and Continuous Deployment (CI/CD)
CI/CD is a software development practice that enables developers to integrate code changes into a shared repository frequently. This process, coupled with automated testing, allows for more efficient and reliable deployment.
A report found that elite performers deploy code 208 times more frequently than low performers, underscoring the link between CI/CD and deployment frequency.
Real User Monitoring (RUM) for Live Performance Insights
RUM involves monitoring and analyzing the actual interactions of users with a website or application in real-time.
This provides valuable insights into performance and user experience.
Using RUM to identify and address performance bottlenecks that users are experiencing in real-time.
A/B Testing for User Experience Optimization
A/B testing, or split testing, involves comparing two versions of a web page or application to determine which one performs better.
This method helps optimize user experience and conversion rates.
According to a study, 71% of companies run 2 or more A/B tests to improve their conversion rates.
Mobile Testing: Addressing the Mobile-First Landscape
With mobile internet usage surpassing desktop usage, mobile testing is essential. It ensures that websites and applications function seamlessly on a variety of mobile devices.
Example: Testing a responsive design to guarantee optimal display and functionality across various screen sizes.
Exploratory Testing: Uncovering Hidden Issues
Exploratory testing involves simultaneously learning about the system and designing test cases. Testers actively explore the application to discover hidden issues.
According to a study, on average, exploratory testing discovers 11% more overall defects than scripted testing.
Code Reviews: Collaborative Quality Assurance
Code reviews involve peer assessment of code changes before merging them into the main codebase.
This collaborative process helps identify issues and ensures code quality.
Monitoring and Logging for Post-Deployment Insights
Implementing monitoring and logging tools allows developers to track the performance of a live system, monitor error rates, and gain insights into user interactions post-deployment.
Analyzing logs to identify and address errors that occur in specific scenarios or user interactions.
Importance of User Acceptance Testing (UAT)
UAT involves testing the system from the end user’s perspective to ensure it meets their requirements and expectations before deployment.
Test-Driven Development (TDD): Writing Tests Before Code
TDD is a development approach where tests are written before the actual code. This practice encourages a focus on requirements and ensures that code meets specifications.
Writing a unit test for a specific function before developing the function itself.
Continuous Testing: Integrating Testing Into Every Phase
Continuous testing is an approach where testing is integrated into every phase of the development lifecycle, aligning with the principles of CI/CD.
Challenges in Testing and Debugging
Despite the benefits, testing and debugging come with challenges such as resource constraints, time limitations, and the complexity of modern web applications.
The Future of Testing: AI and Machine Learning
The future of testing involves leveraging artificial intelligence (AI) and machine learning (ML) to automate testing processes, detect anomalies, and predict potential issues.
Implementing AI-driven testing tools that learn from application behavior to identify patterns and potential defects.
6. Advanced Google Tag Manager Features
Google Tag Manager (GTM) offers a suite of advanced features that go beyond basic tag implementation, enabling users to take their analytics strategy to new heights.
In this comprehensive guide, we’ll explore these advanced features and delve into the impact they can have on data precision and insights.

Data Layer: A Foundation for Advanced Tracking
The data layer is a pivotal component in GTM, acting as a bridge between your website and the tag manager.
It allows for the dynamic transfer of information from your site to GTM, facilitating advanced tracking scenarios.
Imagine an e-commerce website with a dynamic product catalog.
The data layer can dynamically pass product details like name, price, and availability to GTM, enabling granular tracking of user interactions with specific products.
Enhanced E-commerce Tracking with Data Layer Variables
Data layer variables in GTM allow you to leverage dynamic data for e-commerce tracking.
This advanced feature enhances the accuracy and depth of your tracking, providing insights into user interactions with products, transactions, and more.
Custom JavaScript Variables for Dynamic Implementations
Custom JavaScript variables in GTM empower users to execute dynamic and intricate tracking scenarios by incorporating custom JavaScript code directly within the tag manager.
A content-rich website may use custom JavaScript variables to dynamically capture scroll depth, allowing for nuanced insights into user engagement with lengthy articles.
Cross-Domain Tracking for Comprehensive Insights
Cross-domain tracking in GTM is a sophisticated feature that enables seamless tracking of user interactions across multiple domains.
This is particularly valuable for businesses with an online presence spanning various websites.
A multinational corporation with regional websites can implement cross-domain tracking to consolidate user data, providing a unified view of customer interactions across diverse domains.
Server-side Tagging for Enhanced Performance
Server-side tagging is an advanced GTM feature that shifts certain tag processing tasks from the client’s browser to a server, enhancing performance and reducing the load on the client side.
Importing and Exporting Containers for Seamless Collaboration
Importing and exporting containers in GTM facilitate seamless collaboration, allowing users to share configurations across different accounts and environments.
An agency managing multiple client accounts can export container configurations from a test environment and import them into the production environment, ensuring consistency and efficiency in tag management.
Custom Templates for Simplified Configuration
Custom templates in GTM enable users to create reusable configurations for tags, triggers, and variables, streamlining the implementation process and ensuring consistency.
Google Analytics Settings Variable for Centralized Control
The Google Analytics Settings variable in GTM allows for centralized control over Google Analytics configurations, ensuring consistency across multiple tags.
An e-commerce website using multiple tags for different types of interactions can use the Google Analytics Settings variable to maintain uniform tracking settings, avoiding discrepancies in data collection.
Advanced Firing Triggers with Sequences and Groups
Advanced firing triggers in GTM, such as sequences and groups, enable users to create complex conditions for tag activation.
Sequences define a specific order of events, while groups combine multiple triggers into a logical set.
A finance website may use sequence triggers to track user interactions with a multi-step financial calculator, ensuring that tags fire in the correct order to capture the entire user journey.
User-Defined Variables for Custom Data Capture
User-defined variables in GTM allow for the creation of custom variables based on specific user conditions, providing a high degree of flexibility in data capture.
Personalization is valued and appreciated by 93 per cent of businesses. User-defined variables enable personalized data capture, catering to the demand for customized user experiences.
Rollback Feature for Version Control Confidence
The rollback feature in GTM provides a safety net by allowing users to revert to a previous container version if issues arise after publishing changes.
An e-commerce platform launching a new feature can use the rollback feature to quickly revert to a stable configuration in case the new implementation adversely affects user interactions and conversions.
Monitoring and Reporting with Google Analytics Debugger
The Google Analytics Debugger is a browser extension that aids in monitoring and reporting by providing detailed insights into the data being sent to Google Analytics during testing and debugging.
Utilizing Google Tag Manager APIs for Automation
Google Tag Manager APIs offer a powerful toolset for automation, allowing users to programmatically manage and update container configurations.
A large e-commerce enterprise with frequent product updates can leverage GTM APIs to automate the addition of new tracking tags for each product release, ensuring efficiency in the analytics process.
Exporting Container Data to BigQuery for Advanced Analysis
Exporting container data to BigQuery is an advanced feature that facilitates in-depth analysis by leveraging Google Cloud’s powerful data analytics capabilities.
Custom HTML Tags for Unrestricted Implementations
Custom HTML tags in GTM allow for unrestricted implementations, enabling users to inject custom code directly into their web pages for highly specialized tracking scenarios.
A technology blog with unique ad-tracking requirements can use custom HTML tags to implement custom ad tags that capture specific user interactions beyond standard ad-tracking capabilities.
Conclusion
Congratulations on embarking on the journey of setting up Google Tag Manager (GTM) for your website.
This step-by-step guide has walked you through the intricacies of GTM, empowering you to take control of your website’s analytics and gain valuable insights into user interactions.
As we conclude this comprehensive exploration, let’s recap the key takeaways and highlight the transformative impact that effective GTM implementation can have on your digital presence.
Empowering Your Analytics Strategy
In the ever-evolving digital landscape, data is the driving force behind informed decision-making.
By integrating Google Tag Manager into your website, you’ve positioned yourself to harness the power of data-driven insights.
GTM serves as a centralized hub, allowing you to effortlessly manage and deploy various tracking tags without the need for constant code changes.
Precision in Tracking with Tags and Triggers
Tags are the building blocks of your analytics arsenal, enabling the collection of specific data points.
Whether it’s tracking page views, user interactions, or e-commerce transactions, GTM tags offer unparalleled flexibility.
Combined with triggers, which dictate when these tags should fire, you have the tools to capture user engagement with pinpoint accuracy.
This precision is essential for understanding your audience and optimizing your website’s performance.
Advanced Features for Unparalleled Capabilities
As you delve deeper into GTM, exploring advanced features like the data layer, custom JavaScript variables, and server-side tagging, you unlock a realm of possibilities.
These advanced tools empower you to tackle complex tracking scenarios, seamlessly integrate with other Google products, and optimize your analytics strategy for maximum impact.
Testing and Debugging: Safeguarding Data Accuracy
No journey in web analytics is complete without rigorous testing and debugging.
The testing phase is your opportunity to validate configurations, catch potential discrepancies, and ensure that your tracking setup aligns perfectly with your objectives.
Leveraging tools like the Preview mode, debugging console, and real-time data validation instils confidence in the accuracy of your data, setting the stage for reliable insights.
Continuous Improvement Through Monitoring and Analysis
Setting up GTM is not a one-time task; it’s a dynamic process that requires continuous monitoring and analysis.
Utilize real user monitoring (RUM), explore A/B testing for user experience optimization, and implement comprehensive monitoring and logging practices post-deployment.
These strategies ensure that your website adapts to evolving user behaviours, remains resilient to challenges, and consistently delivers a seamless experience.
In conclusion, the journey to set up Google Tag Manager for your website marks a pivotal step toward a data-driven, optimized digital presence.
As you implement what you’ve learned in this guide, remember that GTM is not static—it’s a dynamic tool that evolves with your business.
Regularly revisit your configurations, adapt to industry changes, and explore new features to stay ahead in the fast-paced world of digital analytics.
If you are looking for a top-class digital marketer, then book a free consultation slot here.
If you find this article useful, why not share it with your friends and business partners, and also leave a nice comment below?
We, at the AppLabx Research Team, strive to bring the latest and most meaningful data, guides, and statistics to your doorstep.
To get access to top-quality guides, click over to the AppLabx Blog.
People also ask
What is Google Tag Manager and how do you use it?
Google Tag Manager (GTM) is a tool that simplifies and centralizes the management of website tags. Instead of manually editing code, GTM lets users deploy and update tags, triggers, and variables through a user-friendly interface. It streamlines the process of adding various tracking codes, enhancing data accuracy and flexibility in web analytics configurations.
How do I track using Google Tag Manager?
To track using Google Tag Manager, follow these steps:
- Set up a GTM account.
- Create a new container for your website.
- Add tags (e.g., Google Analytics) using GTM’s intuitive interface.
- Define triggers for when tags should fire.
- Publish the container to apply changes live.
This enables precise tracking without manual code alterations.
How do I access Google Tag Manager on my website?
Accessing Google Tag Manager on your website involves:
- Sign in to your GTM account.
- Select the desired account and container.
- Copy the provided GTM snippet.
- Paste the snippet into your website’s HTML, preferably within the <head> section.
- Save and publish changes.
Now, GTM is active on your site for easy tag management.


 Image Sizes in 2024: The Ultimate Guide")


